Ehack Search Engine

Saturday, March 18, 2017

How to Change Stock Android Arabic Font

How to Change Stock Android Arabic Font 


Hello guys 

As we all know, Samsung uses the FlipFont library in system fonts, which provides a new way of font customizations. But in the same time, this library does not give us the benefit of having two desired fonts together (unless we build our custom font). Samsung has also replaced the stock Android ICS Arabic font with an ugly looking font type.
Samsung uses a system Arabic font stored within "/system/fonts" folder under the name of "GS45_Arab_AndroidOS" as their stock Arabic font, which is the classical font in even older Samsungphones.

Here, I am posting this thread to those people who would like to install their custom "English FlipFont" whether from the market or internet and in the same time want a permanent good Arabic font. This procedure needs root!

1- Choose a TTF font that you would like to use as Arabic font. In this tutorial, I have used the "Adobe Arabic" font. You can find it in the attachments.
2- Rename this file into "GS45_Arab_AndroidOS.ttf".
3- Copy this font into your mobile SD Card (whether internal or external).
4- Using a root explorer on the device, navigate to the font. Copy the font.
5- Navigate now to "/system/fonts" and paste the font there.
6- Fix file permissions into "rw-r--r--".
7- Reboot your device.
8- Enjoy!


Some TTF fonts may fail. If you have an Open-Type Font (OTF), you may use an online font converter to convert it to TTF.

How To Create New Volume Disk Partition In Windows PC

How To Create New Volume Disk Partition In Windows PC


As we stores number of different files in our desktop or laptop in different local drives. We stores all things separately  in drives just like we store movies and music stuff in one drive. Software in another and other files separately but sometimes during partition in fresh window we divide space in different drive in wrong manner means or we want any new separate drive but that is not possible. So we may worry about how to separate or make new drive without formatting your current data present in your drive.
If you are also facing same problem or you want to make new drive but you don’t want to delete any stuff currently present in your drives. Don’t worry after reading this whole process i am confident you learn something new and helpful. Before proceeding must take a small review on my previous topic about setup new Dial up Connection for mobile devices which would be helpful for using internet without any software for mobile.

Steps To Create New Local Drive From Your Current Drives.

Note:- Be conscious  while using this method don’t do or change any selling which are not mentioned in below steps. Any mistake may leads your data deletion if you don’t follow correctly and carefully or create your data backup if Possible otherwise follow whole process carefully.

Part 1:- Method To Find Location

  • Click on Start button >> Then open control panel
  • Change Your Icon view from Top Right corner Top Large Icons.
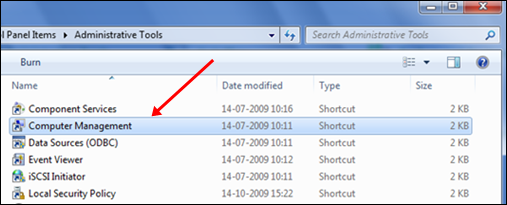
  • Find Administrative Tools and open it.
administrative tools
  • Then on second place there is an option of Computer Management, open it.
computer management
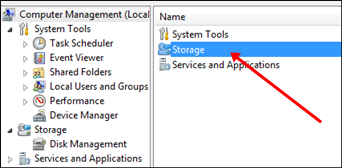
  • New window will appear then on second place there is option for Storage just open it
storage
  • Then open Disk Management. Now Your all local appears and follow below steps carefully for partition.

Part 2:- Method To create New Partition

Note:- Suppose Your all space already allocation to all drives and your want to shrink them and want to create new drive. Lets take example If you drive is of 60GB and 30GB is already full and then available space will be 30GB and from 30GB free you just want to get 10GB then you have to shrink that drive with 10GB space.
In same manner if your device have 5 drives with 60GB and you shrink all of them with 10GB then at the end total available space will be 50GB
Steps To Shrink Particular Drive:-
  • Suppose You want to shrink your all drives with 10GB then follow these steps one by one for all drives.
  • Right Click on Your Drive Which you want to shrink.
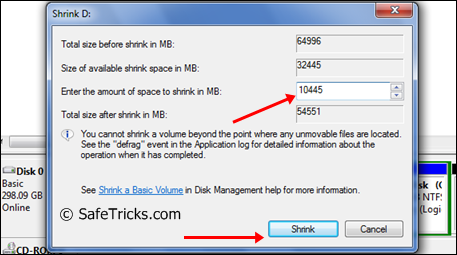
shrink space
  • Then click on Shrink Volume button and new window will be appears.
  • Carefully change the shrink values you want just as i mention in above Note 
  • Click on Shrink volume and after shrinking your space will become free.
  • Now follow same process with other drive if you want to make new drive with more space.
Steps To Make new Partitions:-
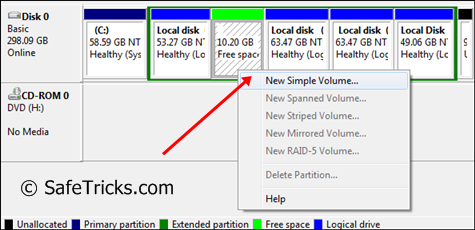
  • After shrinking all the space will become free and it will appear on the window.
  • Now Right Click on your free space and Create New Simple Volume.
new partition drive
  • Now Assign any alphabet which want to appear for you drive and continue
  • Finally Your New fresh Drive is created.
I Hope you like my little bit effort to make all the partition steps more clear. If you have any another simplest way to create or merge partition then must leave your ideas with me in comments box. For any issue must leave your precious comment.

How To Dual Boot Windows And Linux (Ubuntu)

How To Dual Boot Windows And Linux (Ubuntu)


How To Dual Boot Windows And Linux ubuntu
The battle between Windows and Linux is far more interesting than Android vs iOS. While no one can argue with the fact that Windows is the most used operating system for PC all over the globe, Linux is also a very popular operating system and becomes a good choice for the pro user. Today, Windows has far too many problems. Privacy is long gone, application installers are full of malware and many more. While Linux may provide solutions to these problems, it isn’t perfect. This is because most softwares that people are used to running on windows do not offer Linux versions and need to be replaced. Also, Linux is more of an advanced OS with technical features over user experience. Hence, a normal user may not want to use Linux. So the question, How do you choose the best OS? Well, we say choose both. Here in this article, will are going to show you how you can install and dual boot Windows and Linux on your PC so you can have the best of both worlds. It is possible to install both Windows and Linux on a single PC and dual boot which ever you like. Let’s get into the step by step guide.

How To Install And Dual boot Windows And Linux.

Given below is an easy, simple step by step guide on to dual boot Windows and Linux on PC. Follow the steps carefully to run both OS on a single machine.

Steps To Dual boot Linux And Windows 7,8 or 10 are :

Step 1. Download the ISO file for any of the Linux distributions. We are using Ubuntu in this tutorial and you can grab the latest version of Ubuntu below.
Step 2. Download Rufus on your Windows PC.

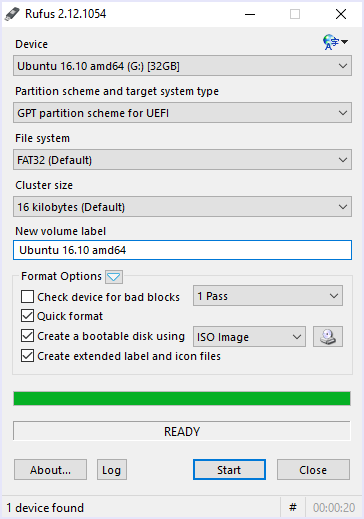
Step 3. Now plug-in a USB flash drive with 8GB or 16GB storage and use the Rufus tool to create a bootable USB drive for Ubuntu as shown below.
rufus install lunix
In case you face any kind of issue while creating bootable device using this tool then we recommend you try other bootable pendrive software.
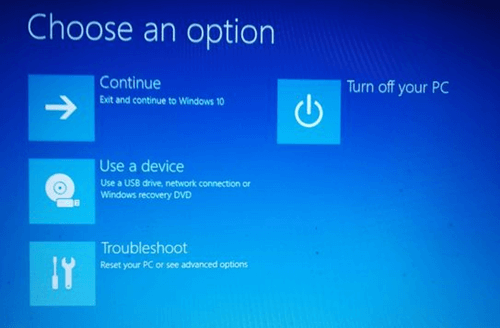
Step 4. Once the drive has been optimised, turn off the System and Boot from the USB drive. You may need to adjust some boot setting which can be done by entering into the boot menu of the system. This can be done by , Turn on the machine while repeatedly pressing the machine’s special boot key. The special key varies between different computer manufacturers:
Dell:- Tap F12 when the Dell logo is displayed.
HP:- Tap F12 when the HP logo is displayed.
Lenovo :- Tap F12 when the Lenovo logo is displayed
Apple:- Hold Option (next to the ⌘ key) when the computer first turns on.
Other:- Try tapping Esc, F1-12, Del or Enter during bootup or either do google search for bootable button for your device.
boot lunix from usb
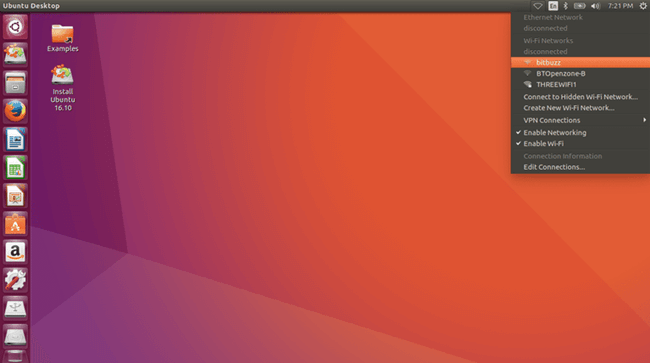
Step 5. Once you are able to boot from USB drive, you will see three options. Here select try Ubuntu and see that the OS starts running, let’s begin installing it along side windows OS by connecting to the internet.
Step 6. Now on your desktop, you will be able to see a shortcut icon “Install Ubuntu”. Click it to start the process.
install ubuntu on hard disk
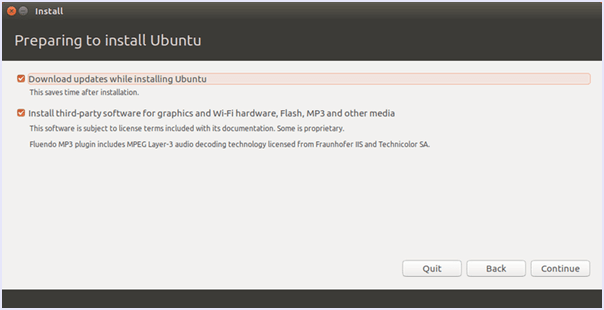
Step 7. Follow the steps for the installation, select the language and choose if you want updates, as well as necessary 3rd party software’s.
preparation for installation of ubuntu
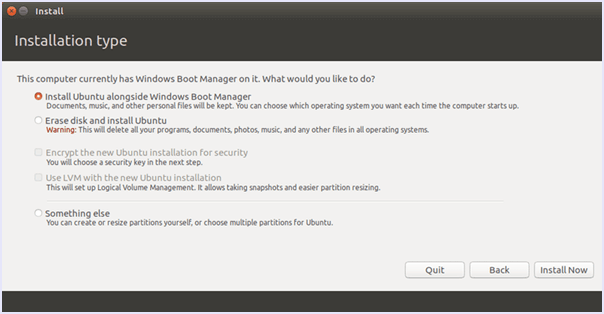
Step 8. In the next step, choose install Linux alongside windows boot manager. Here you can install it in any partition you like. Make sure you don’t have any data there as it will be formatted. To know more about making partitions on windows, read here.
install ubuntu alongside windows
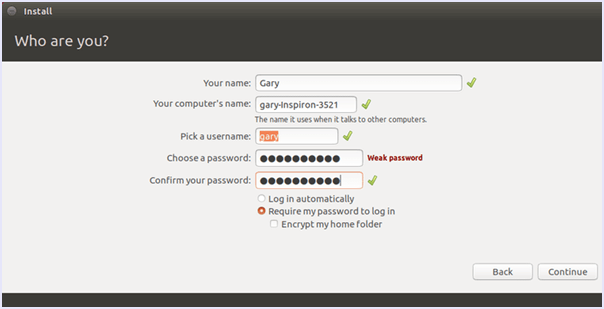
Step 9. Complete the rest of the steps of installation like choosing location as well as entering user details.
complete ubuntu account setup
And now, you have successfully completed the installation for Linux on your windows running PC. You can choose to boot up any OS according to your need.
In conclusion, we hope that you find this guide on how to install and dual boot Windows and Linux on PC useful. For any help, assistance or queries, feel free to contact us or leave a comment down below. We’d love to hear from you.

10 Tips That Makes Your Browsing Speed Faster

How To Make Browsing Speed Faster (10 Tips)


How To Make Browsing Speed Faster
Today with the advancement of technology, Internet is used everywhere. Internet provides a medium to connect devices and networks to each other and allows sharing of resources with each other. Internet is used in every field like Banking, Business, Education, Entertainment, Online shopping, Internet Marketing, Advertisement etc. Internet can be accessed on a computer through a web browser. Web browsers provide an interface to access content over network. When we open a web site, our web browser sends a request to web server and the response to our web browser is in the form of web pages. Now-a-days everyone requires fast internet speed to get their work done fast and save their time. Even while using a fast internet connection sometimes the web browsing experience may not be very pleasant due to browser compatibility issues and some hardware related issues. As we can boost internet speed by reducing data usage But do not worry, if you are experiencing a slow web browsing speed on a fast internet connection, we have the solution to make browsing speed faster. Listed below are some of the most useful tips and tricks to speed up your web browser.

How To Make Browsing Speed Faster.

1. Use Virtual Ram For Better Performance.

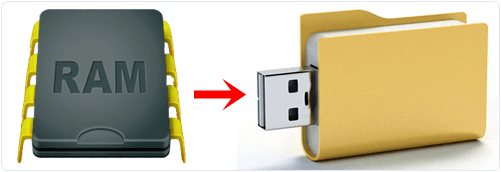
We know that every application runs in RAM and data processing for that app takes place in RAM. If you have small RAM then it can not process your data and webpages and run your application very well simultaneously. Most browsers today require high RAM memory for functioning properly. If you do not want to purchase new ram sticks, you can also use your pendrive for readyboost purpose to make browsing speed faster.
Pendrive as ram

2. Close Unwanted Applications.

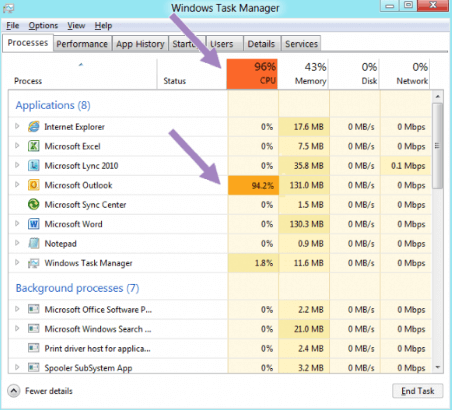
Most heavy software’s like Adobe Photoshop, Games and background processes consume large amount pf RAM memory. Hence, it is always advised to close all the unnecessary applications open in the background while browsing the internet. You can also hit refresh a few times. This allows more system resources available for the processing of web pages leading to faster web browsing speed experience.
close extra apps task manager

3. Use New Tabs Instead Of New Windows.

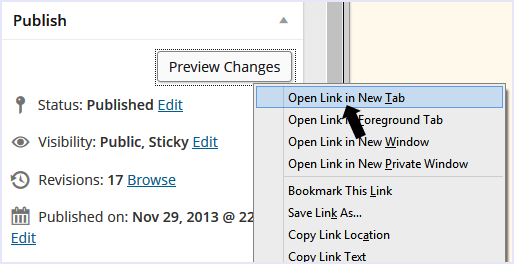
Mostly people when surfing internet open a new a link in new window instead of using a new tab. Switching between tabs takes less time while switching between windrows is more time consuming. Also opening a new window will utilize more system resource in terms of RAM while opening new tab will use a new thread only.
open in new tab

4. Update Your Browser.

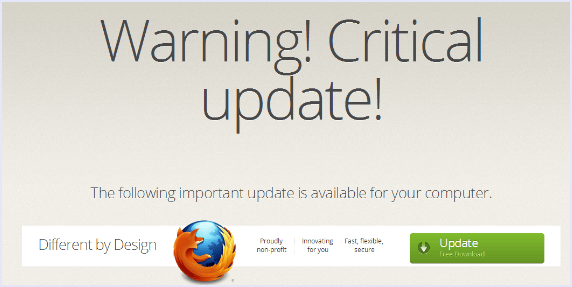
It is possible that you may be experiencing slow internet browsing due to an outdated browser. Most users make the mistake of not updating their web browser leading to incompatibility with new web pages as well as slow browsing speeds. Hence, we advise you to use the latest up to date version of your web browser.  You can always check for updates under “Settings >> About” in your web browser.
update firefox

5. Use Minimum Extensions.

Firefox and Google Chrome provide great option for all its extensions, but when you use a lot of extensions then they can cause the browser to get slow and buggy. Hence, to increase the speed and efficiency of your web browser, you must disable the unnecessary extensions. This will keep your web browser light weight and snappy.

6. Remove Extra Toolbar.

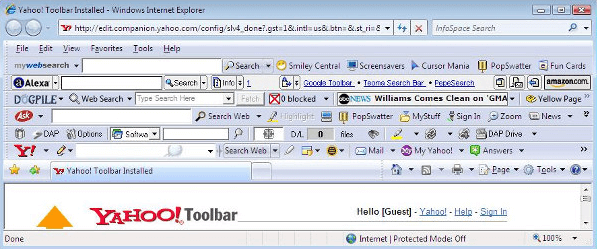
If you want to make browsing speed faster then you need to remove extra tool bars from your browser because some tool bars simply take up precious computer memory while others eat bandwidth by simply sending and receiving data in background. Most free toolbars that automatically get installed on your web browser are usually full of malware and slow down your web browser. If you don’t want to  compromise your browser speed then you must remove extra tool bars from it.
toolbars

7. Disable Flash.

Adobe flash format is available everywhere on the internet. Many animated advertisements are designed to run via Flash. But Flash is slow and hence, reduces the speed of web browsing. So, we suggest to turn it off when you don’t need it. Internet explorer provide default option to turn it off while Chrome and Firefox have extensions to turn it off.

8. Protect Your System From Virus.

One main reason for the lag in your web browsing experience on a fast internet connection may be due to virus on device. Virus slow down data processing and mess with the usage of bandwidth. Therefore, reducing the web browsing speeds on your device. We recommend you to check for virus on your device by using any trusted antivirus app that you like.

9. Turn In  Prefetch Resources.

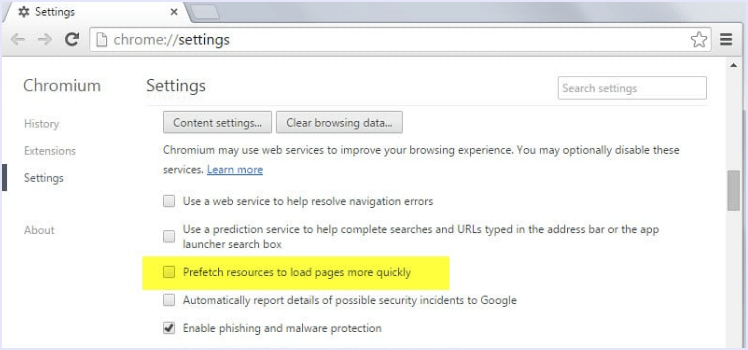
Many browsers have the intelligent feature of resource pre-fetching. what this feature does is that it enables the browser to intelligently decide what links are most likely to be opened next by the user and pre loads a part of the next webpage and keeps it ready to be shown. This make browsing speed faster by a great extent.
prefetch resources

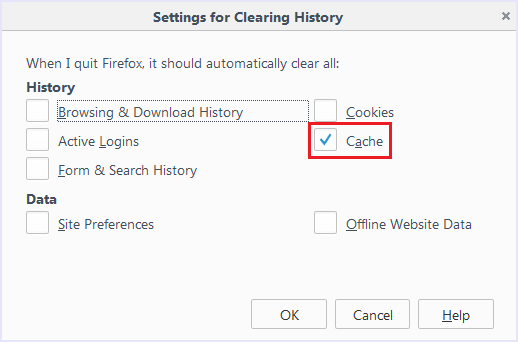
10. Clear Cache, History and Cookies.

This is a great trick to do if your web browser shows some lag while browsing or your web pages are not loading properly or you suddenly feel that your browser is glitchy. Just head to the settings of your browser and under history, clear Cache, History and Cookies and just restart your browser.
clear cookies cache
In conclusion, These are some of the most effective ways to quickly speed up your web browser and get a better experience to make browsing speed faster on your device. If you need any help, or have a suggestion for us, please share it with us in the comment box below.

How To Reduce PDF Size Without Losing Quality

How To Reduce PDF Size Without Losing Quality


How To Reduce PDF Size Without Losing Quality
With the increased use of computers and internet in most fields of personal as well as professional life, everything around us is being digitized. Physical things have now been almost digitized to utmost extent. We now have everything stored with us in digital format in our tiny storage device that carry gigabytes of memory. We have photos, music, videos and a lot more in formats that we can now save on our computers and over the internet. In the same way, computer engineers have found the perfect way to store and share documents on a computer and online. There are multiple ways to do so, yet the most efficient, and the best way to do so is by using the PDF format. PDF stands for PORTABLE DOCUMENT FORMAT. This means that the file is so portable because it contains every detail of the layout of the document along with text, font, graphic details and others that remain constant irrespective of the software and system hardware. Thus, it is the most used format for sharing documents online even we easily manage then using online PDF editors. In order to make the sharing and emailing documents quick and snappy, every user prefers to reduce the size even we have various alternative files formats in which we can convert PDF. So if you are looking for a way to reduce PDF size without losing quality, we have the perfect solutions for you. We have found and listed below, the best methods to reduce PDF files szie. They work both online and offline. Hence, you can choose the best according to your need.

How To Reduce PDF Size Without Losing Quality.

Here are the best ways to reduce size of PDF files that you can follow to save time as well as storage space. So here you go :

1. PDF Converter Software.

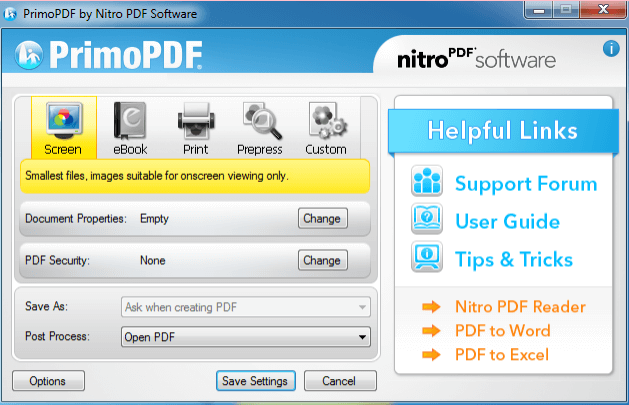
One of the best ways to create and optimise PDF documents is to install a simple PDF Converter Software. There are some free tools available on the internet such as PrimoPDF that helps to do just that. It allows quite some optimisations and also gives the option to reduce PDF files size.
primopdf

Here are the steps to do so.

1. Download and install PrimoPDF from the link given below.
2. Open the PDF file and click on Print.
3. In the dialog box, select the printer to “PrimoPDF” and then head to “Properties”.
4. Choose the screen quality option to get the smallest PDF possible.
5. Click apply and then click Print.
Note : Reduced size is good for viewing on the screen but not good for printing on paper.

2. Online PDF Compression Tool.

There are multiple online tools that help in quick compression and reduction in size of PDF files. One such tool, and one of the best ones is SmallPDF. SmallPDF.com is an online server tool that instantly reduces the size of any PDF file. There is no limit on file size or on the number of times you can use the service.
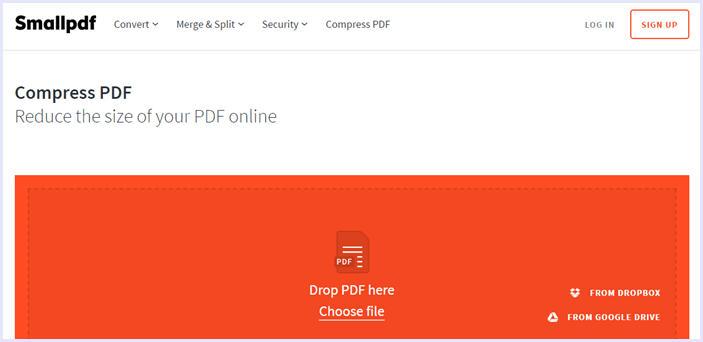
smallpdfHere’s how to use it :
1. Visit ” smallpdf.com
2. Upload your PDF file on the website.
3. Wait for the compression process to complete.
4. When the compression is complete, click on the ” Download ” button to download the compressed file.

3. Reduced PDF Size In Adobe Acrobat.

Believe it or not, there is a compression feature built-in Adobe Acrobat.
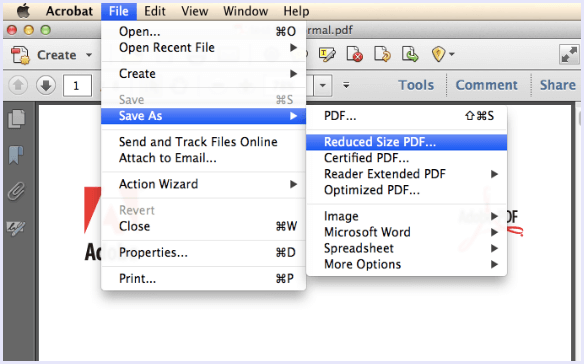
reduced size pdf
Here are the steps to use it.

1. Open the file in Adobe Acrobat.
2. Click on the “File” option on the top left corner.
3. In the drop down menu, click on “Save as other”.
4. From a side menu, click on “Reduced Size PDF”.
5. Select the compatibility, and prefer newer versions.
Note :- You can click on “Apply to Multiple” to select multiple files and reduce their size.

4. PDF Optimizer Tool.

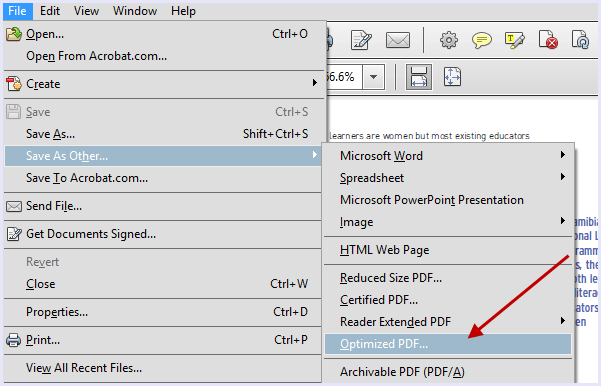
Another option that helps in reducing size of a PDF file given in Adobe Acrobat is PDF Optimizer Tool. It doesn’t downgrade the quality of the document but it saves space by removing duplicate fonts, compression of images and many other tweaks.
Note :- Some changes might result in bad document quality. Check the document before committing to any changes.
optimized pdf

Steps to use the PDF Optimizer are:

1. Open the file in Adobe Acrobat.
2. Click on the “File” option on the top left corner.
3. In the drop down menu, click on “Save as other”.
4. Select “Optimized PDF”.
5. In the pop up window, click on Audit Space Usage.
6. Now you can tick the aspects of your PDF file that you want to optimise.
7. Press OK to apply changes and click on SAVE to finalize.

5. Use Compression.

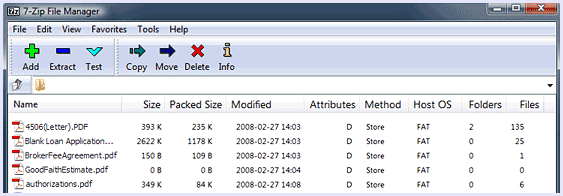
The last ultimate resort to reduce PDF size without losing quality is by compressing it into a .rar file. You can do it simply using the inbuilt tools in both Windows and Mac and creating .zip files. You can also use programs like 7zip and winrar to compress your PDF files. Click below to download.
Download buttoncompress pdf
In conclusion, we have given the best and the most effective ways to reduce PDF size without losing quality. Share your experience with us in comments below and tell us which method you find most convenient.

How To Recover Deleted Files From Recycle Bin

How To Recover Deleted Files From Recycle Bin

How to recover deleted files from Recycle Bin
We use computers in every field. May it be professional or personal work, we always find use for computers in our life. Therefore, we are dependent on our computers to a high extent. Computers are highly efficient machines used in offices and corporate sector as well. Personal computers are used by people to send emails, create documents, listen to music and watch videos and much more. Hence, every computer has a lot of important files stored on it which are very important for the user. Any user’s worst nightmare is when they loose a file they wanted. People accidentally delete files and folders and regret it later. So its better to use backup software for PC. But People constantly look for ways to recover deleted files when they don’t have any backup. So if you want to recover deleted files from recycle bin, worry no more. We have perfect guide for you with complete solution for how to recover deleted files from recycle bin. Below we have mentioned everything that you need to know.

How To Recover Deleted Files From Recycle Bin.

What Is Recycle Bin ?

Recycle bin is a feature of Windows OS that is a lifesaver for all the users. It is a temporary storage where all the files deleted by the user are stored as they are not permanently erased from the system. In Windows, you can access it by a very simple method. There is a Dustin icon found on the desktop. Double clicking on this icon opens the recycle bin directory.

Steps To Recover Deleted Files From Recycle Bin.

Recovering Deleted files from recycle bin is a very easy process. Here are the steps to recover deleted files from recycle bin :
Step 1. Go to the desktop screen on your Window PC.
Step 2. Double click on the Bin icon to access the Recycle Bin directory.
recycle binStep 3. From the list of deleted files find the file that you want to recover. You can also use the search and sort features like you would normally do in the Windows explorer to locate your file.
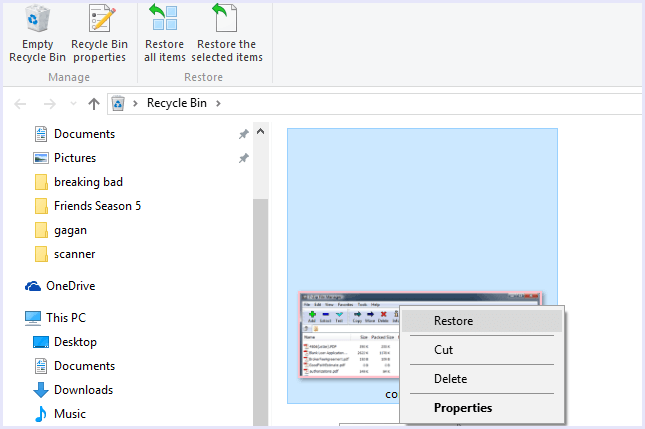
Step 4. After you have found your file, right click on it and click on “Restore”.
restore recyclebin
Now your file will be recovered from to recycle bin. You can now access it normally from its original location.

Recover Files Deleted From Recycle Bin.

The most critical problems arise when you want to recover a deleted file from recycle bin but you have either emptied the recycle bin or permanently deleted the file by accident. We do not have a built in way to recover such files but do not worry as there is a definite work around this problem and you can get your files back by following this simple procedure.
Here are the steps to recover permanently deleted files from recycle bin :
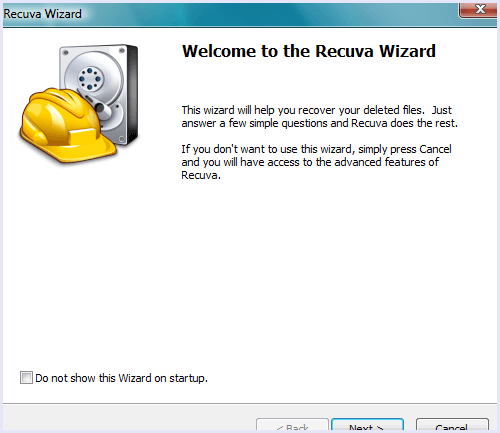
Step 1. Download, install and run the program on your computer from the link below.
install recuva
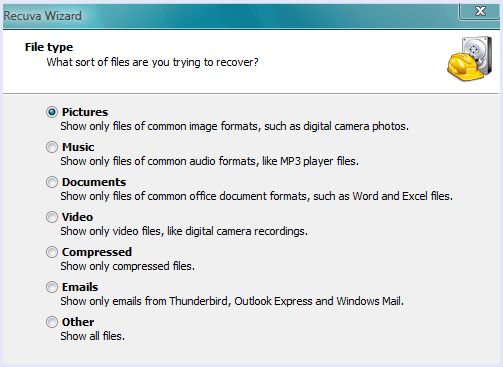
Step 2. Check any one of the given options to specify the type of file you are trying to recover.
recuva file type
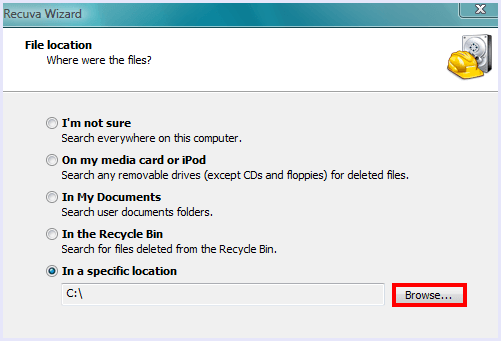
Step 3. Select the location where you want to retrieve the files from.
recuva storage selection
Step 4. In the next screen, click “Start” button. Don’t select deep scan option until you fail on your first attempt to recover the file as it is very time consuming.
Step 5. To retrieve the file, check the box next to file name in the scan results and click on “Recover” button.
In conclusion, we hope the above guide about how to recover deleted files from recycle bin on windows helps you in case you are in trouble and need any help, feel free to contact us.